Photographing your own artwork should be a routine part of the workflow for both amateur and professional artists. The reasons for doing so are numerous and the process need not be very complicated or expensive. The learning curve for a simple setup is easy, especially for those who already have a camera and are familiar with shooting in manual mode. This post is designed to be easy to read with links to suggested tutorials to learn more on each topic.
Reasons for photographing your own artwork.
- Create a permanent digital record
- Submit to juried shows and galleries
- Build a catalog of your works
- Make reproductions of your are to sell
- Creative digital alterations or composites of your work
Basic Considerations for photographing your own Artwork
The Space
The space you choose for photographing your works may well be predetermined by your budget or available room in your existing studio or home. If you are creating a new space and buying new gear, take note of the following:
- Length – The size of your art and focal length of your lens will impact the distance from the art to the position you stand behind the camera. This concept is called Field of View (FOV).
- Color – Color can be easily reflected onto the image from the paint as well as other objects in the space. If starting with a new space consider painting the walls white so that “bouncing” the lights is an option. If using an existing space you may need to cover some items with blackout material to prevent unwanted color reflections.
- Light – You should be able to control the light sources in the room. Any light that is not intentional should be eliminated. Turn off the regular overhead light, cover any windows, and close the doors to the room.
Useful Links
- Photography Talk provides an good discussion on Field of View (FOV).
- Spyros Heniadis has a nice YouTube video on DIY V-flats.
- Dan Sanchez article on selecting paint color for photography studio.

Physical Components
Choosing the physical components can be a daunting task. For most people this will be limited by their budget. A best practice is to have a budget in mind then search for the desired features then proceed to check product reviews before making a decision. If the features you require are not available in your budget then consider alternatives such as renting, borrowing, or buying used.
Camera Body
There is no substitute for a proper camera. A great deal of time could be spent researching camera features, debating brand names, waiting for the next great camera body to be released and much more. To get started keep the following in mind:
- DO NOT USE YOUR CELL PHONE – The images will be too small to reproduce or edit properly and the image will likely be distorted due to insufficient lens capabilities.
- The camera MUST have manual settings. These will be discussed under “Camera Settings.”
- Generally avoid “kits” as the lens will not have maximum capabilities.
- If you intend to use the camera for regular photography, put a bit more research into this and also consider the weight of the camera with lens if planning to travel with it.
Useful Links
- B&H Photo has a live chat feature that is very useful when shopping for just about any type of camera, lighting, or other electronics. The chat agent is a real person and will provide links to each item they recommend.
- Digital Photography Review offers a handy side-by-side comparison tool that you can use when starting to narrow your search down.
Lens
The camera lens or “glass” is generally considered more important than the camera itself by most serious photographers. As mentioned above (“The Space”), the focal length of the lens may be limited by the length of space in your studio. When shopping be aware of the following:
- Prime Lens – a prime lens has a fixed “focal length” which means it cannot be zoomed in or out. This is generally ideal for shooting art as there is less distortion than with zoom lenses.
- Compatibility – Ensure that the lens you purchase will work with the camera. Otherwise, crucial functions available in the camera settings may not transfer to the lens or it may not even fit on the camera.
- Consider renting/borrowing a lens before buying and always buy from a reputable dealer that will accept returns in case it does not work for any reason.
Useful Links
- Ken Rockwell has provided an extensive review of hundreds of lenses and camera bodies. This is a great place to find detailed information on the lens you already have or help you in finding a new one.
Lights
Many people will already have their space, camera, and lens and ready to buy their first lighting system. The good news is that compact and affordable kits are available very affordably.
- Natural sunlight: This is rarely an option as consistent light is important for shooting your art. However, this may be a suitable alternative for those just getting started while digesting camera settings and other topics. If this is for you, look for “open shade” and practice
- Continuous vs Flash: Continuous lights stay on during your whole photography session. These are especially nice for beginners as it is easy to see how the light works with your art. They are typically larger in physical size than any type of flash or strobe, but are less powerful. Off-camera flash units (speedlights) will provide more power for a smaller space, but definitely add a much larger hump to the learning curve.
- Quantity and Quality: The quantity of light is basically the intensity of light. In the case of continuous lights this can often be regulated with a dimmer switch or variable control knob. The power of speedlights will be controlled by their settings. Both types can be controlled by the distance between the light and your art.
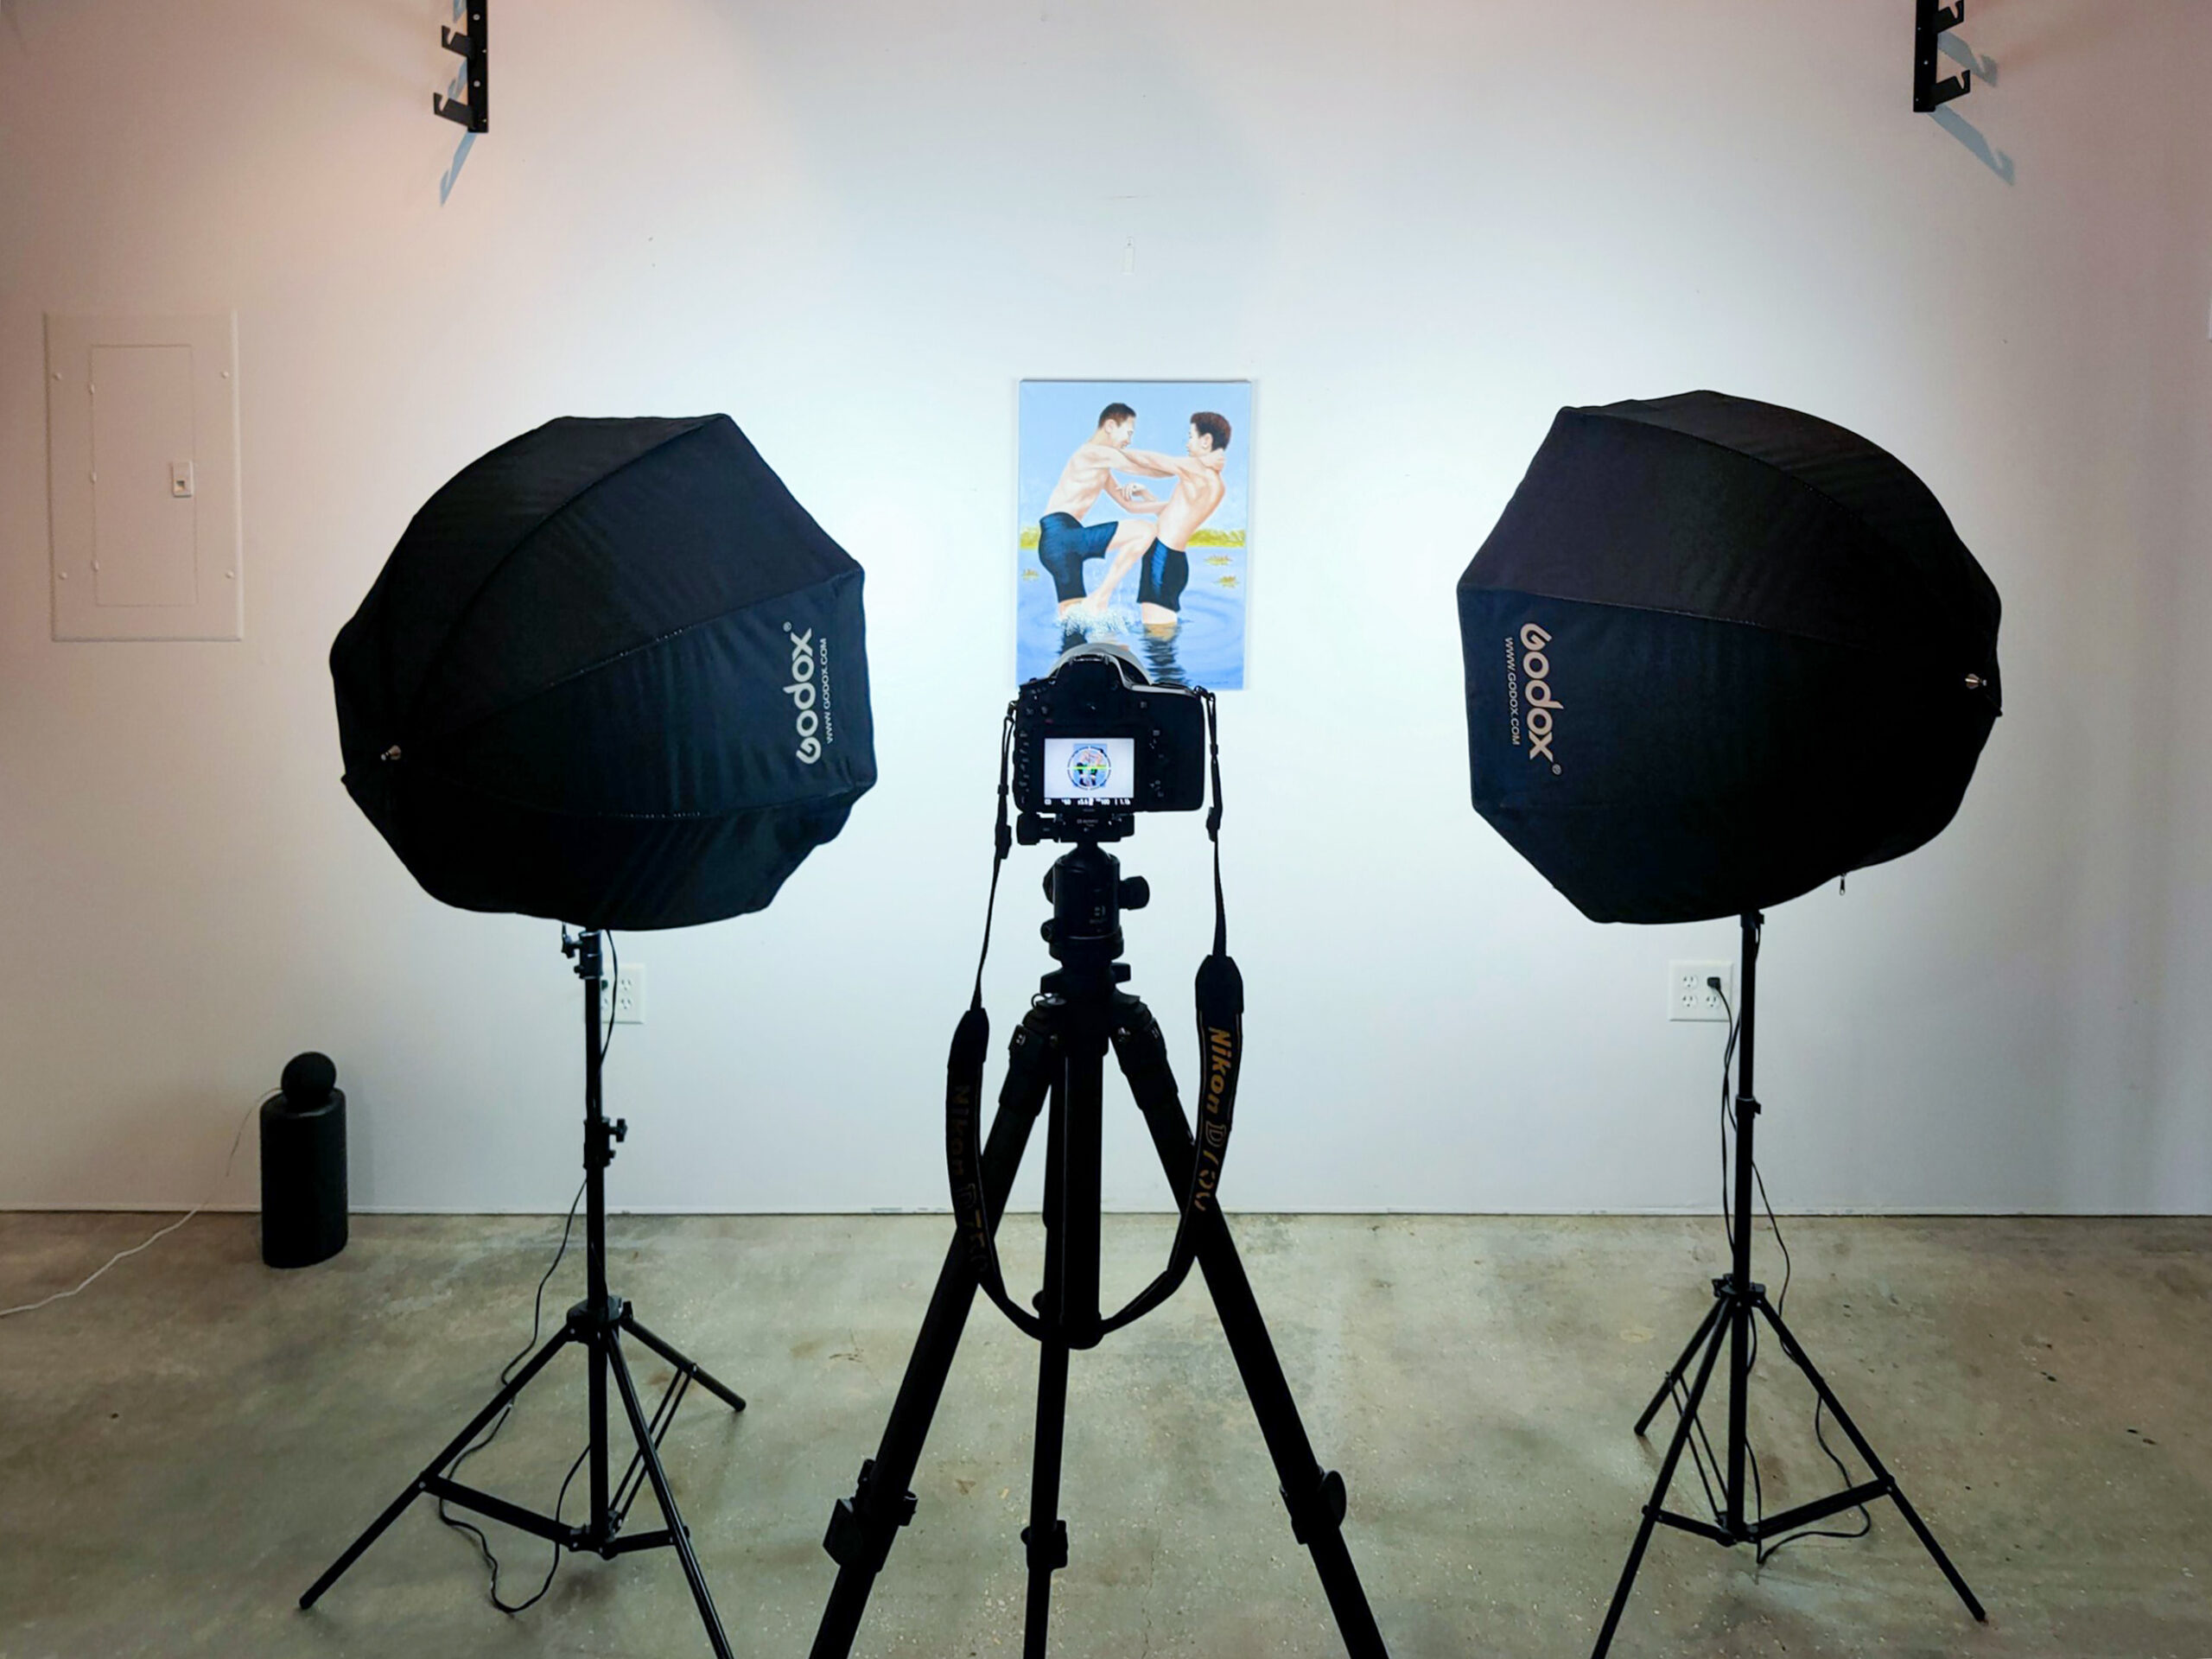
- Positioning: In a simple setup, start with two lights to either side of the art at approximately 45 degree angles. Adjust the angle to remove glare and adjust the distance to control intensity. When you find the best position draw a simple diagram with notes so that future shoots can be consistent and easy to setup.
Useful Links
- The Click Community has a great introduction to “Open Shade“.
Accessories
-
- Tripod – It is imperative that the camera be mounted such that the face of the lens is exactly parallel to the art (which should be mounted on the wall without glass). A tripod is the only way to properly achieve this. For those on a super tight budget you could consider setting the camera on a table across from your artwork
- Remote shutter release – These are important so that you do not introduce “camera shake” when pressing the shutter release as this can cause the image to blur, even if it is imperceptible. However most cameras have a timer feature which is a totally suitable exception.
Camera Settings
As with the entirety of this process, nearly every choice is affected by or impacts something else. This is especially true with camera settings. Here are some basics with recommended settings for beginners.
-
- ISO: This number determines how sensitive your camera’s sensor will be to light reflected on it. ISO 100 is generally considered the be the best starting point. The number can be increased in low light situations, but this should NOT be the case in a studio set up for shooting artworks. If you find that your ISO setting needs to be much higher, take a good look at your lighting situation because the higher ISO settings will often result in lower quality images not suited for large reproductions or high quality prints.
- Aperture: The aperture is how large the opening is for your lens. The lower the number, the larger the opening. For shooting artwork, research the “sweet spot” for your particular lens and use this as a starting point. This will become more important for very large scale art to prevent distortion towards the edges. To save time researching this topic, start at f/8.0 as this is commonly the sweet spot for many lenses.
- Shutter speed: The shutter speed is how long the shutter stays open. This length of time will depend on the ISO & aperture settings of the camera as well as the light source. The camera should be on a tripod for this type of work, so it is okay to go with lower shutter speeds (1/60th or slower).
- White balance: Generally speaking start with this on automatic. If the results seem to cool (blueish tone) or too warm (yellow tones), be sure no additional lights (overhead room lights for example) are interfering with the shoot, or research manual settings for white balance.
- File format (raw vs jpg): Raw files are always the best as they allow the most flexibility with editing. For a beginner, this will definitely add a layer of complexity to the learning curve. Jpg files are the most common for displaying on social media and for printing, but the camera itself will have already “baked in” many of the variables. If your camera can create both at the same time, that is a good way to start as you may wish to come back to the raw files later in life.
- Focus mode: Use on of the automatic focus modes available for your camera. Choose a mode in which all of the focus points are on the art that you are shooting. For small art, a single focal point is probably best.
Useful Links
- B&H article on The Exposure Triangle. Understanding the Exposure Triangle (ISO/Aperture/Shutter Speed) is absolutely essential to being successful with any type of photography.
Editing and Cataloging
Please note that this section is incomplete.
There are a variety of applications available for editing the images you produce of your artwork. I am personally only familiar with the Adobe products such as LightRoom and PhotoShop. Lightroom is excellent both editing your raw (as well as jpg) files AND for cataloging these files. PhotoShop is excellent for creative digital manipulation of your work.
Both of these applications have fairly steep learning curves and both have monthly fees. I recommend starting with LightRoom and find an instructor that works well for your learning style on YouTube, CreativeLive, Udemy, or something similar.
Workflow is the process by which you do your work. What is right for you may not be the same for someone else. However, it is a good idea to study some workflow methods early on and develop your own style. File-naming, for example, is an important part of the workflow process as is backing up data.
Useful Links
- Ben Willmore is one of my favorite instructors for learning LightRoom and Photoshop. His classes are on a variety of platforms, but I have found that CreativeLive works well for me. They offer a monthly rate that includes as many classes as you can handle or you can purchase them one by one and have lifetime access or download them.
- For outstanding step by step guides to PhotoShop check out PixImperfect for free on YouTube.
Advanced Topics
-
- Color Checker – If perfection is required, a color checker is an important part of the toolkit. This is a card with a range of colors that you shoot prior to shooting your images. That image is then used to create a profile to adjust the white balance in the editing process.
- Monitor calibration – Modern monitors often provide very brilliant results that will not match what you see when the image is printed. If perfect prints are required, you can have color corrections done by a professional or consider using hardware to calibrate the monitor.
- Exporting Images – Different settings will be required for each type of export you will do and will invariably be different from each other. There is a concept called color space which is the range of colors available. The color space can well be different for each device, platform (Instagram vs your own website), printers, etc. It can be an extremely frustrating concept to master, but through trial and error as well as researching this topic, various export profiles can be created so that the perfect file can be created for each of your needs.
- File size – This is another part of the export settings and will often be limited by the platform in which the works will be displayed, printed, or submitted. For submissions to shows, be sure to read and meet their requirements. For social media – try to meet the ideal settings or they will adjust it for you. Social media platforms may change their way of handling files, so check back on the best settings on occasion. For printing works, generally the bigger the better, but there may be other considerations. Check to see if a “printer profile” is available when printing commercially or for your own studio printer.
When to Use a Professional
There are situations in which it would be foolish to even bother setting up a space, buying a camera & lens, learning the shooting and editing process and everything else that goes along with shooting your own artwork. For example, if an artist is occupied full time creating their works and the demand for their art is high, that person would be better off to pay someone else to shoot it for them. Also in the case of submitting works to high level galleries or juried events with stringent requirements that you cannot achieve yourself, a professional is the best option.
Note, however, that even the best photographers from other areas (weddings, portraits, architecture, etc) may lack the experience to shoot your artworks. Keep this in mind and ask for samples of their work and history of shooting art.
Useful Links
- Arabi Visual Arts offers a variety of studio rental packages as well as budget friendly photography of your artworks if you are in the New Orleans area.
- For a higher level local service in the New Orleans area, our neighbor at Art Conscious is well qualified for shooting very high quality images and printing of edition and museum quality works.
Alternatives
For some people, it is not feasible based on budget or available space to shoot your own art and a professional may not work either.
One alternative may be to rent a small studio on a monthly or quarterly basis. Arabi Visual Arts offers a variety of studio rental packages in the New Orleans area to meet these needs as well as DIY product photography and other options.
A second alternative is to join together with some other artists or a local art club. Perhaps one person could provide the space while another provides the camera gear.